tutorial · 2026-04-13
Make Particles Spawn on a Mesh Surface with Static Mesh Location in Niagara
How to use the Static Mesh Location module to make particles take the shape of any mesh in UE5 — and why an extruded glyph makes a perfect proving ground.
Why spawn particles on a static mesh surface at all
If you want particles in Niagara to spawn on a static mesh surface in UE5, the temptation is to fake it: spawn in a box, then mask out anything that strays off the shape. That fights the simulation the whole way and the silhouette never quite reads. The clean answer is to let Niagara place each particle directly on the geometry from the moment it is born, so the emitter inherits the shape for free instead of approximating it.
The module that does this is 'Static Mesh Location'. It samples a static mesh and writes a position onto each new particle that lies on the mesh's surface. Point it at a sphere and your particles wrap a sphere; point it at a character mesh and they cling to that character; point it at an extruded letter and they spell. The shape of the emission becomes a property of the mesh, not of hand-tuned spawn maths.
An extruded text or symbol mesh is the ideal way to learn the module, because the result is unambiguous. If the silhouette is wrong, you can read it instantly — the letter is broken. That is exactly how the Niagara Alphabet & Symbols Bundle is built: 687 Niagara Systems, each one a glyph whose particles are placed by 'Static Mesh Location' sampling the matching extruded-glyph static mesh. The same 688 meshes ship alongside, so the spawn surface and the carve-able prop are one and the same asset.
The two pieces: Static Mesh Location and Write To Particle Position
'Static Mesh Location' on its own computes a sample point on the mesh, but it does not automatically commit that point as the particle's actual position unless you tell it to. The setting that closes the loop is 'Write To Particle Position'. With it enabled, the sampled surface point is written straight into Particles.Position, so the particle truly sits on the mesh rather than just carrying a sample coordinate you would otherwise have to apply yourself.
Mechanically, the flow is: 'Static Mesh Location' picks a point on the surface during particle spawn, and because 'Write To Particle Position' is true, that point becomes where the particle lives. Leave it false and you keep the sample as a separate attribute — useful for advanced setups where you offset or blend it, but for a straight 'particles on the surface' look it is the source of the classic mistake where the module appears to do nothing.
1. Add a CPU Sprite emitter to your Niagara System and open it.
2. In the 'Particle Spawn' group, add the 'Static Mesh Location' module.
3. Assign your target mesh to the module's mesh slot (see the next section on where it reads the mesh from).
4. Enable 'Write To Particle Position' on the module so the sampled surface point is written into the particle's position.
5. Give the emitter a 'Spawn Rate' high enough that the accumulated points read as a continuous surface, then add an 'Initialize Particle' module to set size, colour and lifetime.
6. Play the system. The particles should now appear glued to the mesh's surface. If they spawn at the origin in a blob instead, 'Write To Particle Position' is almost certainly still off.
Source mode: Default Mesh Only vs sampling a placed component
The next decision is where the module gets its mesh. 'Static Mesh Location' offers a source mode, and the two cases you will use most are reading a mesh asset baked into the system versus sampling a Static Mesh Component that exists in the level.
The default-mesh approach hard-references a static mesh asset directly on the module. The system is then self-contained: drop it anywhere and it always forms the same shape, which is exactly what you want for a library of fixed glyphs. Every system in the Alphabet & Symbols Bundle works this way — each NS_ system already points at its own SM_Glyph_ mesh, so dragging the system into the level is all it takes to get the shape, with no per-instance wiring.
Sampling a placed component instead binds the module to a Static Mesh Component you nominate, typically via a user parameter you set from Blueprint. This is what you reach for when the spawn surface is dynamic — particles that should crawl over whatever mesh an actor happens to be using, or an effect that retargets onto different geometry at runtime. It is more flexible but adds a binding step, so prefer the baked-mesh route whenever the shape is fixed and only move to component sampling when you genuinely need the surface to change.
Using an extruded glyph mesh as the spawn surface
A glyph mesh is just a static mesh whose silhouette is a letter or symbol, extruded to give it depth so there is a real surface to sample. Feed one to 'Static Mesh Location' with 'Write To Particle Position' on, and the emitter spells. This is the entire premise behind the bundle: 26 source fonts and glyph sets are baked into extruded meshes, and a Niagara System is built per glyph to sample its own mesh.
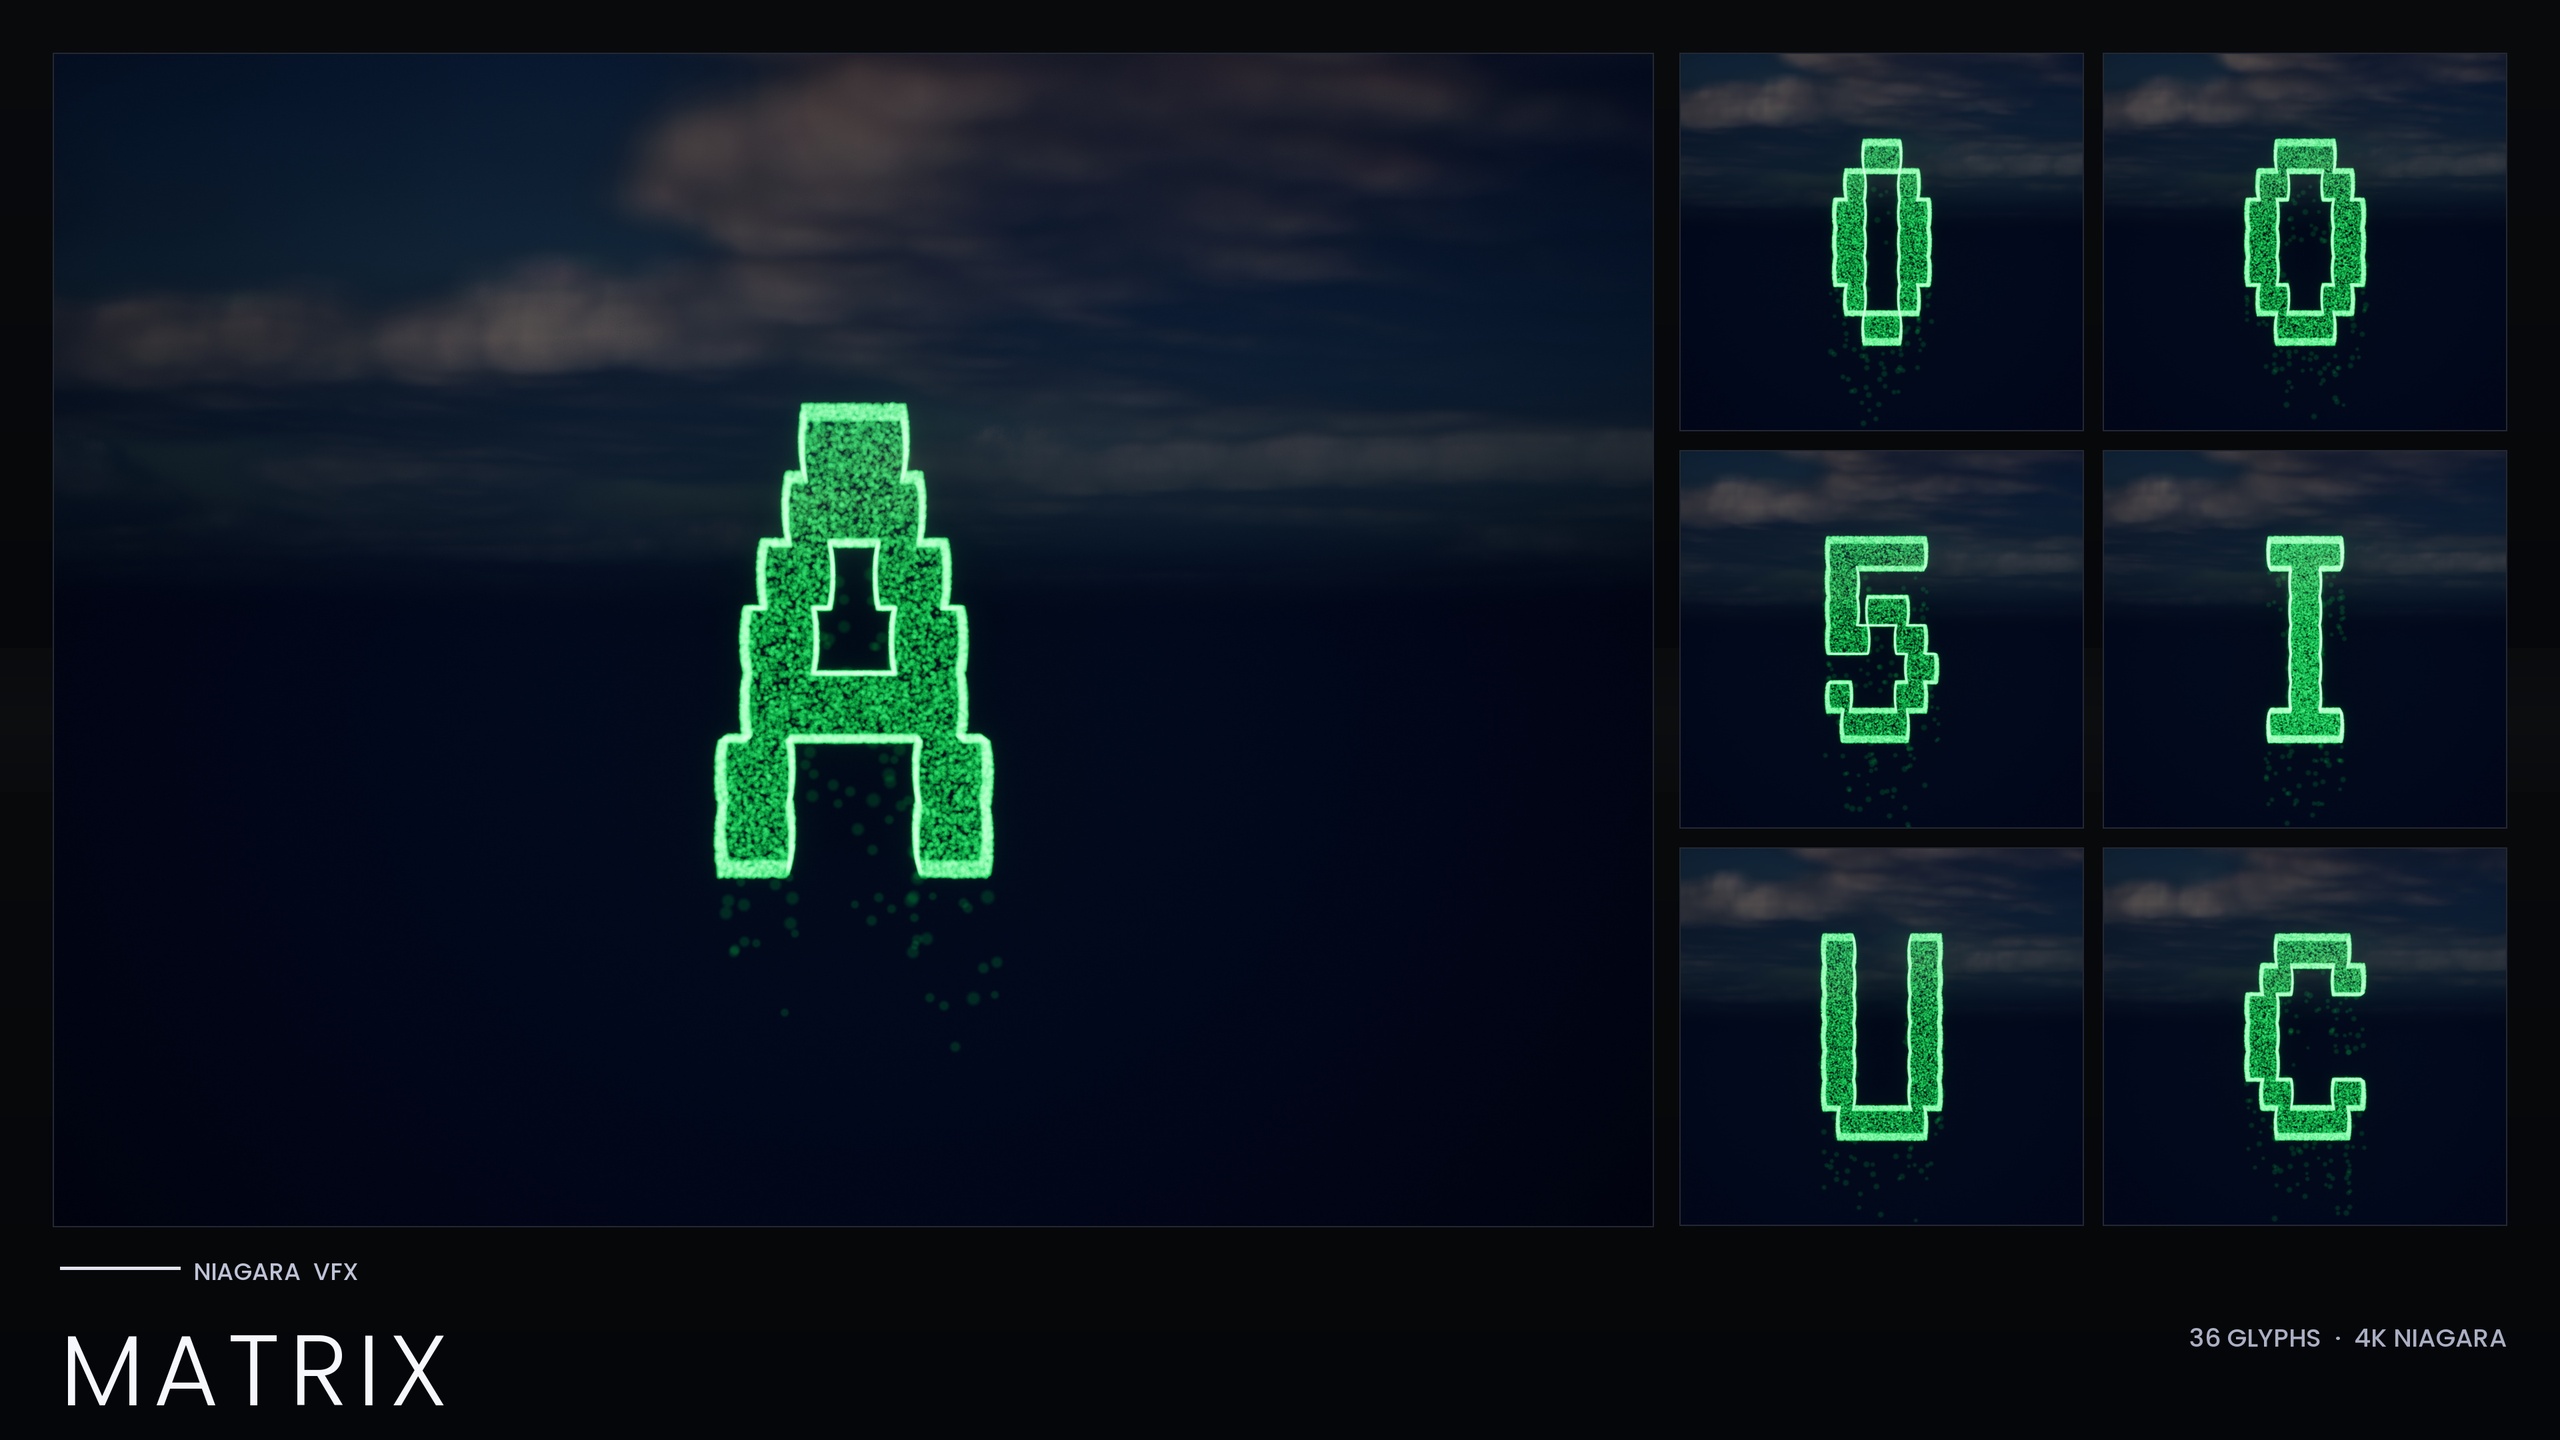
Because the shape comes from the mesh, your emitter settings stay generic. The same emitter logic works for an 'A', a hieroglyph, a Mayan logogram or a Matrix character — only the referenced mesh changes. That is why a single, well-built sampling emitter scales to hundreds of systems without bespoke work per character, and why you can carve the same SM_Glyph_ mesh into a wall as a prop while its NS_ twin lights it up with particles.
If you are building this yourself, model or font-extrude the glyph, keep it a single static mesh with sensible bounds, and assign it to the module. Spawn density is the main thing to tune: too few particles and the letter looks dotted, too many and you waste a CPU sim that is already paying per particle. Everything in the bundle targets CPU simulation and uses only Unreal's default material with no textures, which keeps the footprint small and the device support broad — a useful constraint to copy in your own surface-sampling emitters.
Driving the silhouette with layered emitters on one mesh
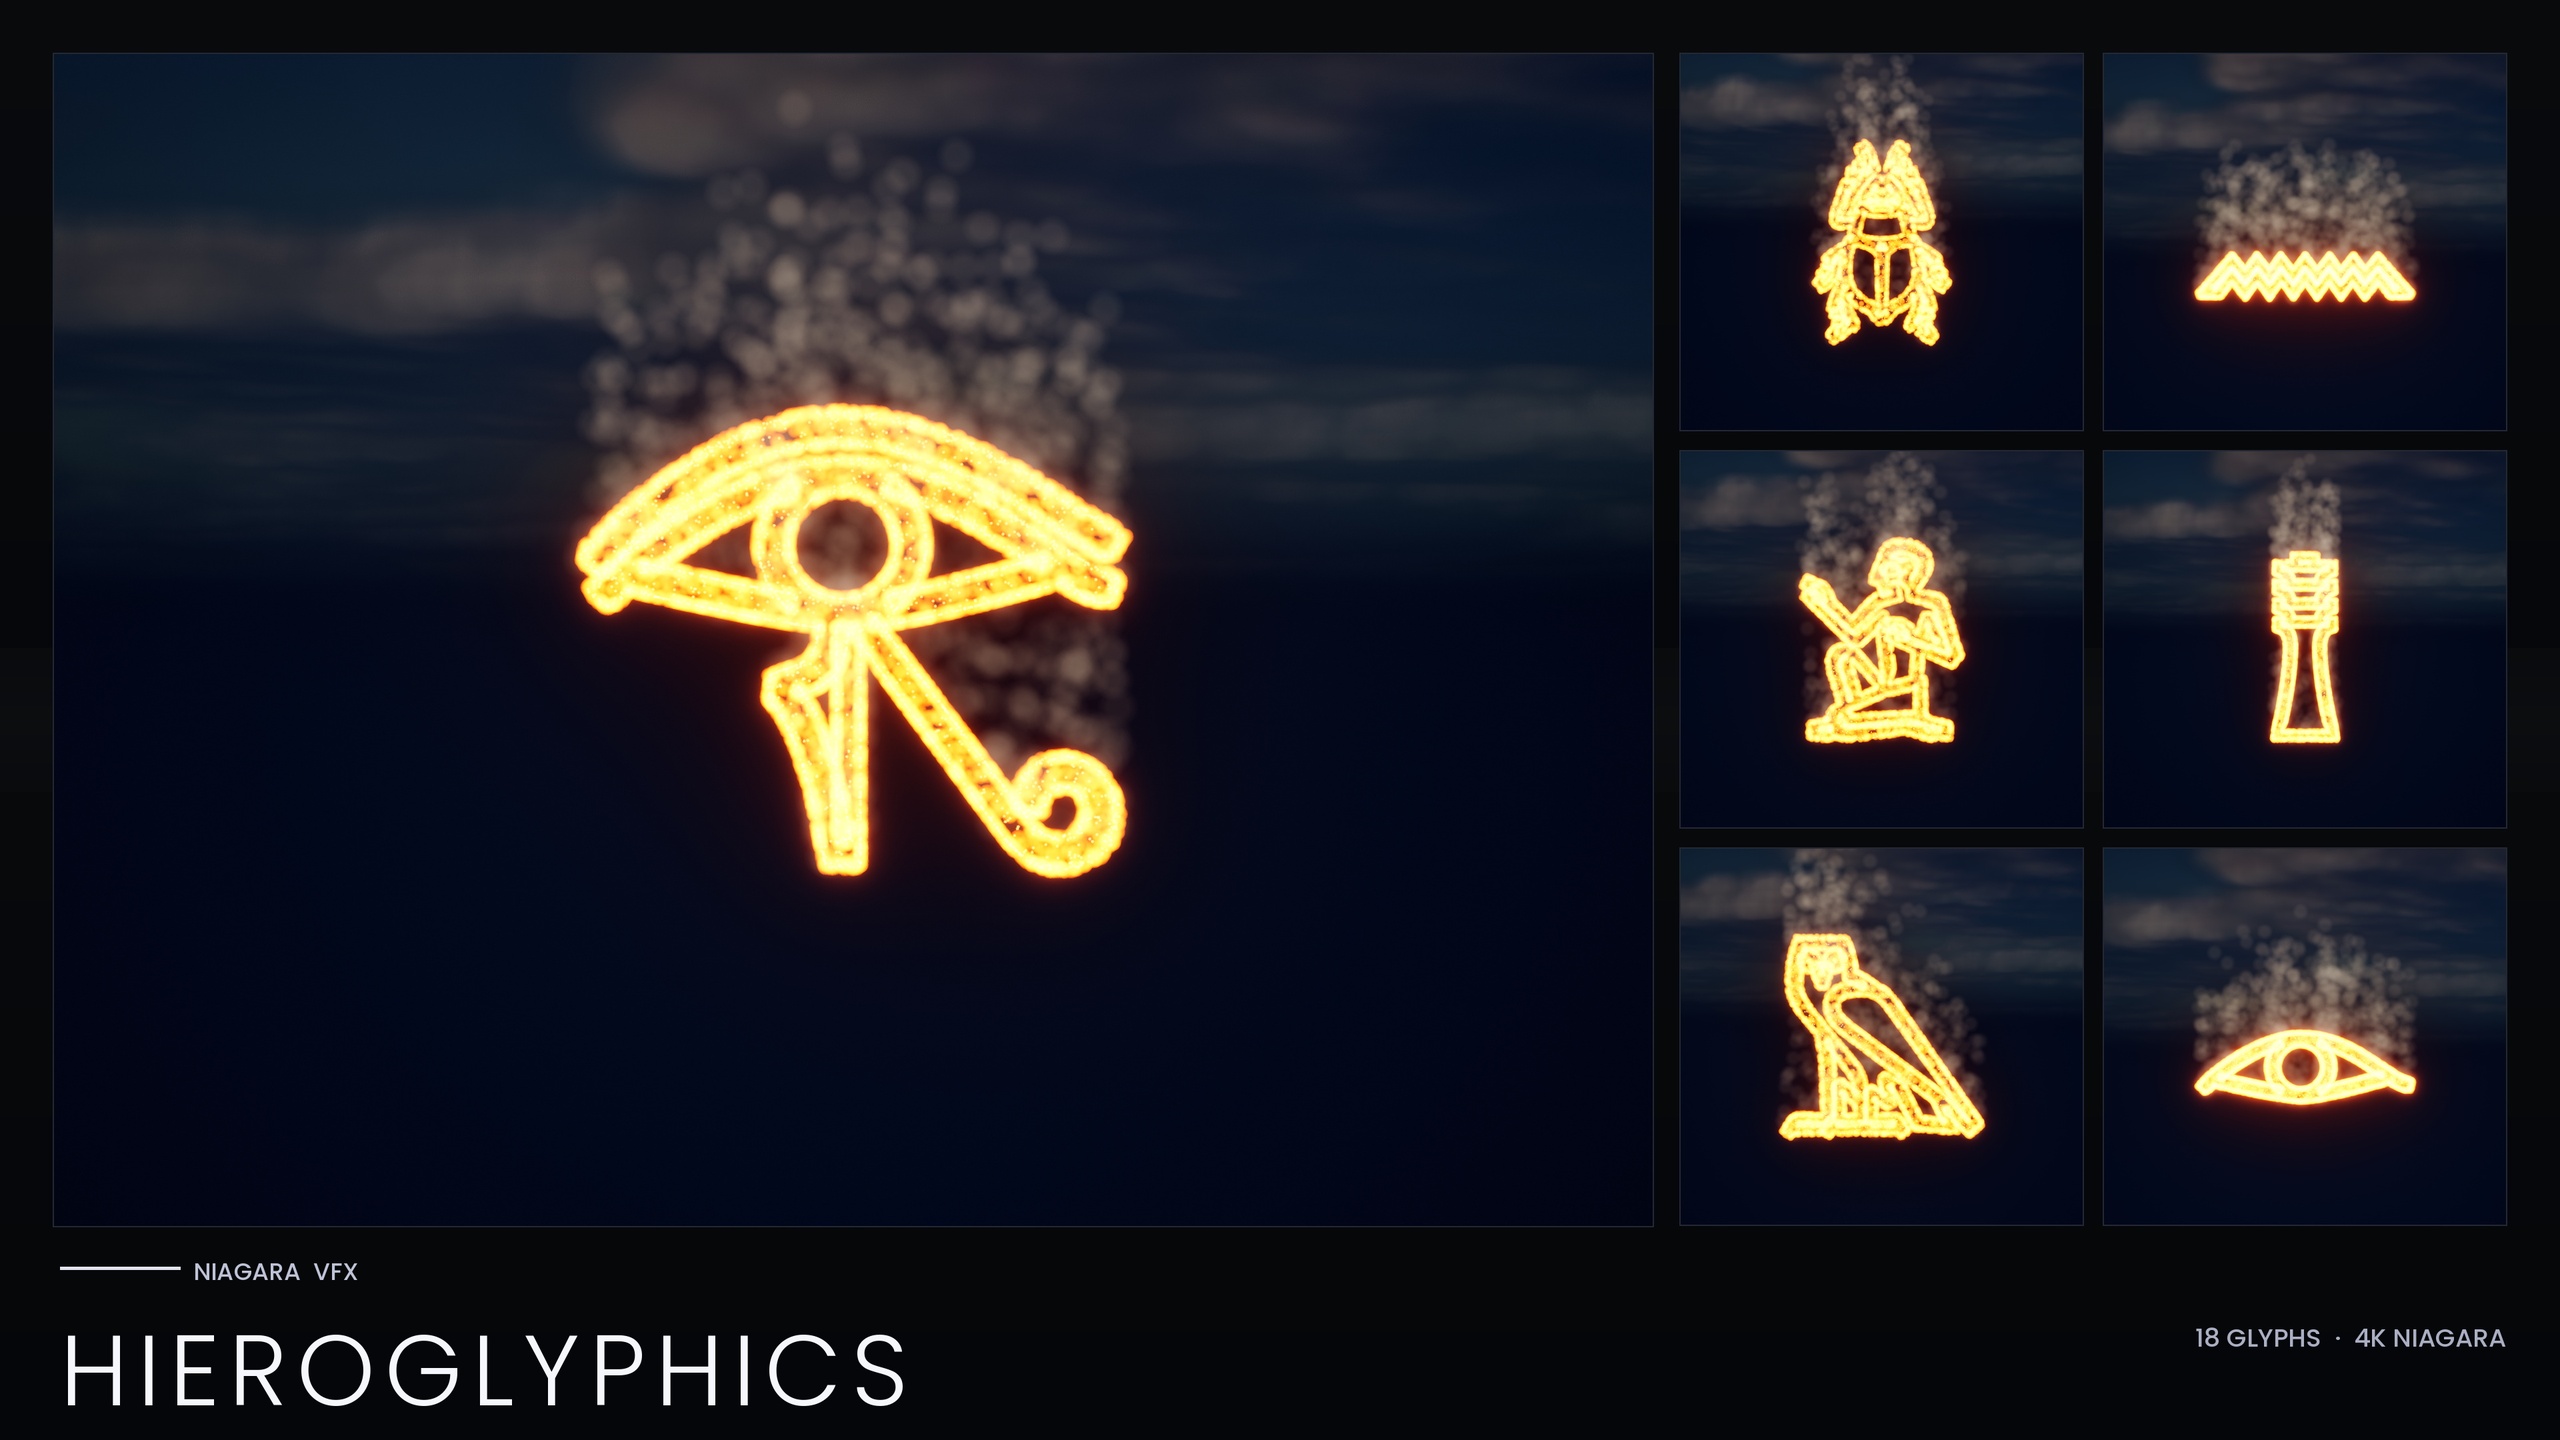
A single emitter dotted across a surface reads as the shape but rarely sells the effect. The trick the bundle uses is to point several emitters at the same mesh, each sampling the identical surface but playing a different role, so the layers composite into one believable object. The hieroglyph systems are the clearest example: three emitters share the glyph mesh — an EmberCore of hot HDR particles for the bright body, an EmberGlow halo in red-orange around it, and a slow Smoke column that wafts upward off the surface.
Each emitter still uses 'Static Mesh Location' against the same mesh, so they all agree on the silhouette; what differs is colour, size, lifetime and motion. The core is bright and tight, the glow is larger and dimmer to fake bloom spill, and the smoke is given a small upward velocity, light gravity and drag so it drifts rather than sticking. Layering this way means the shape never falls apart, because every layer is anchored to the same sampled geometry.
Colour management across those layers is worth automating. Most themes in the bundle ship a Niagara Parameter Collection — for example NPC_HieroglyphicsStyle — so the ember, glow and smoke colours, their sizes and spawn rates can be retuned for an entire writing system from one asset, with per-glyph overrides still available. The glow itself is just HDR sprite colour above 1.0 driving the engine's bloom, so keep bloom enabled in your post-process or the layered look collapses to flat sprites.
Where to go from here
The pattern is portable: 'Static Mesh Location' plus 'Write To Particle Position' turns any static mesh into a spawn surface, and stacking purpose-built emitters on that one mesh gives you a finished effect rather than a cloud of dots. Build it once on a glyph where mistakes are obvious, and you will reuse the same emitter scaffold on characters, props and environment meshes with confidence.
If you would rather start from a working reference than wire it from scratch, the Niagara Alphabet & Symbols Bundle gives you 687 systems already set up this way, with two demo maps (L_Demo_AllPacks and L_Demo_PackRows) that lay the whole catalogue out so you can open a glyph, inspect exactly how the sampling emitters are configured, and adapt the setup to your own meshes. If you only need one writing system, the standalone Hieroglyphics, Ancient Scripts and Matrix packs are focused subsets of the same library.
Surface-sampling glyph packs in the line
| Pack | Niagara Systems | Emitters per glyph | Style control |
|---|---|---|---|
| Alphabet & Symbols Bundle | 687 | Varies by theme | 4 Niagara Parameter Collections |
| Ancient Scripts Pack | 114 | Varies by script | 1 Niagara Parameter Collection |
| Hieroglyphics Pack | 18 | 3 (EmberCore, EmberGlow, Smoke) | 1 Niagara Parameter Collection |
| Matrix Pack | 36 | 2 (Spark, Rain) | Inline constants (no NPC) |
All packs sample an extruded-glyph static mesh with Static Mesh Location; counts are from each product's listing.
FAQ
How do I spawn particles on a static mesh surface in Niagara in UE5?
Add the 'Static Mesh Location' module to your emitter's Particle Spawn group, assign the static mesh you want to sample, and enable 'Write To Particle Position'. The module computes a point on the mesh surface for each new particle, and Write To Particle Position commits that point as the particle's actual position so it sits on the geometry.
My particles spawn in a blob at the origin instead of on the mesh — why?
That is the classic symptom of 'Write To Particle Position' being left off. Without it, Static Mesh Location computes a sample but never applies it to the particle position, so everything spawns at the system origin. Enable Write To Particle Position on the module and the particles will snap to the surface.
Should I bake the mesh into the system or sample a component from the level?
Bake the mesh onto the module when the shape is fixed — the system becomes self-contained and forms the same shape wherever you drop it, which is how every glyph system in the Alphabet & Symbols Bundle works. Sample a placed Static Mesh Component, usually bound from Blueprint, only when the spawn surface needs to change at runtime.
How do I get the glowing, layered look rather than flat dots?
Point several emitters at the same mesh, each using Static Mesh Location but with different colour, size and motion — for example a bright HDR core, a dimmer halo, and a drifting smoke column. The glow comes from HDR sprite colour above 1.0 driving the engine's bloom, so keep bloom enabled in your post-process settings.
Can I use the same mesh as both the spawn surface and a placed prop?
Yes. In the Alphabet & Symbols Bundle each glyph ships twice — as a spawnable Niagara System and as a matching static mesh — so the SM_Glyph_ mesh you sample for particles is the same one you can place in the world to carve or emboss and light with emissives.
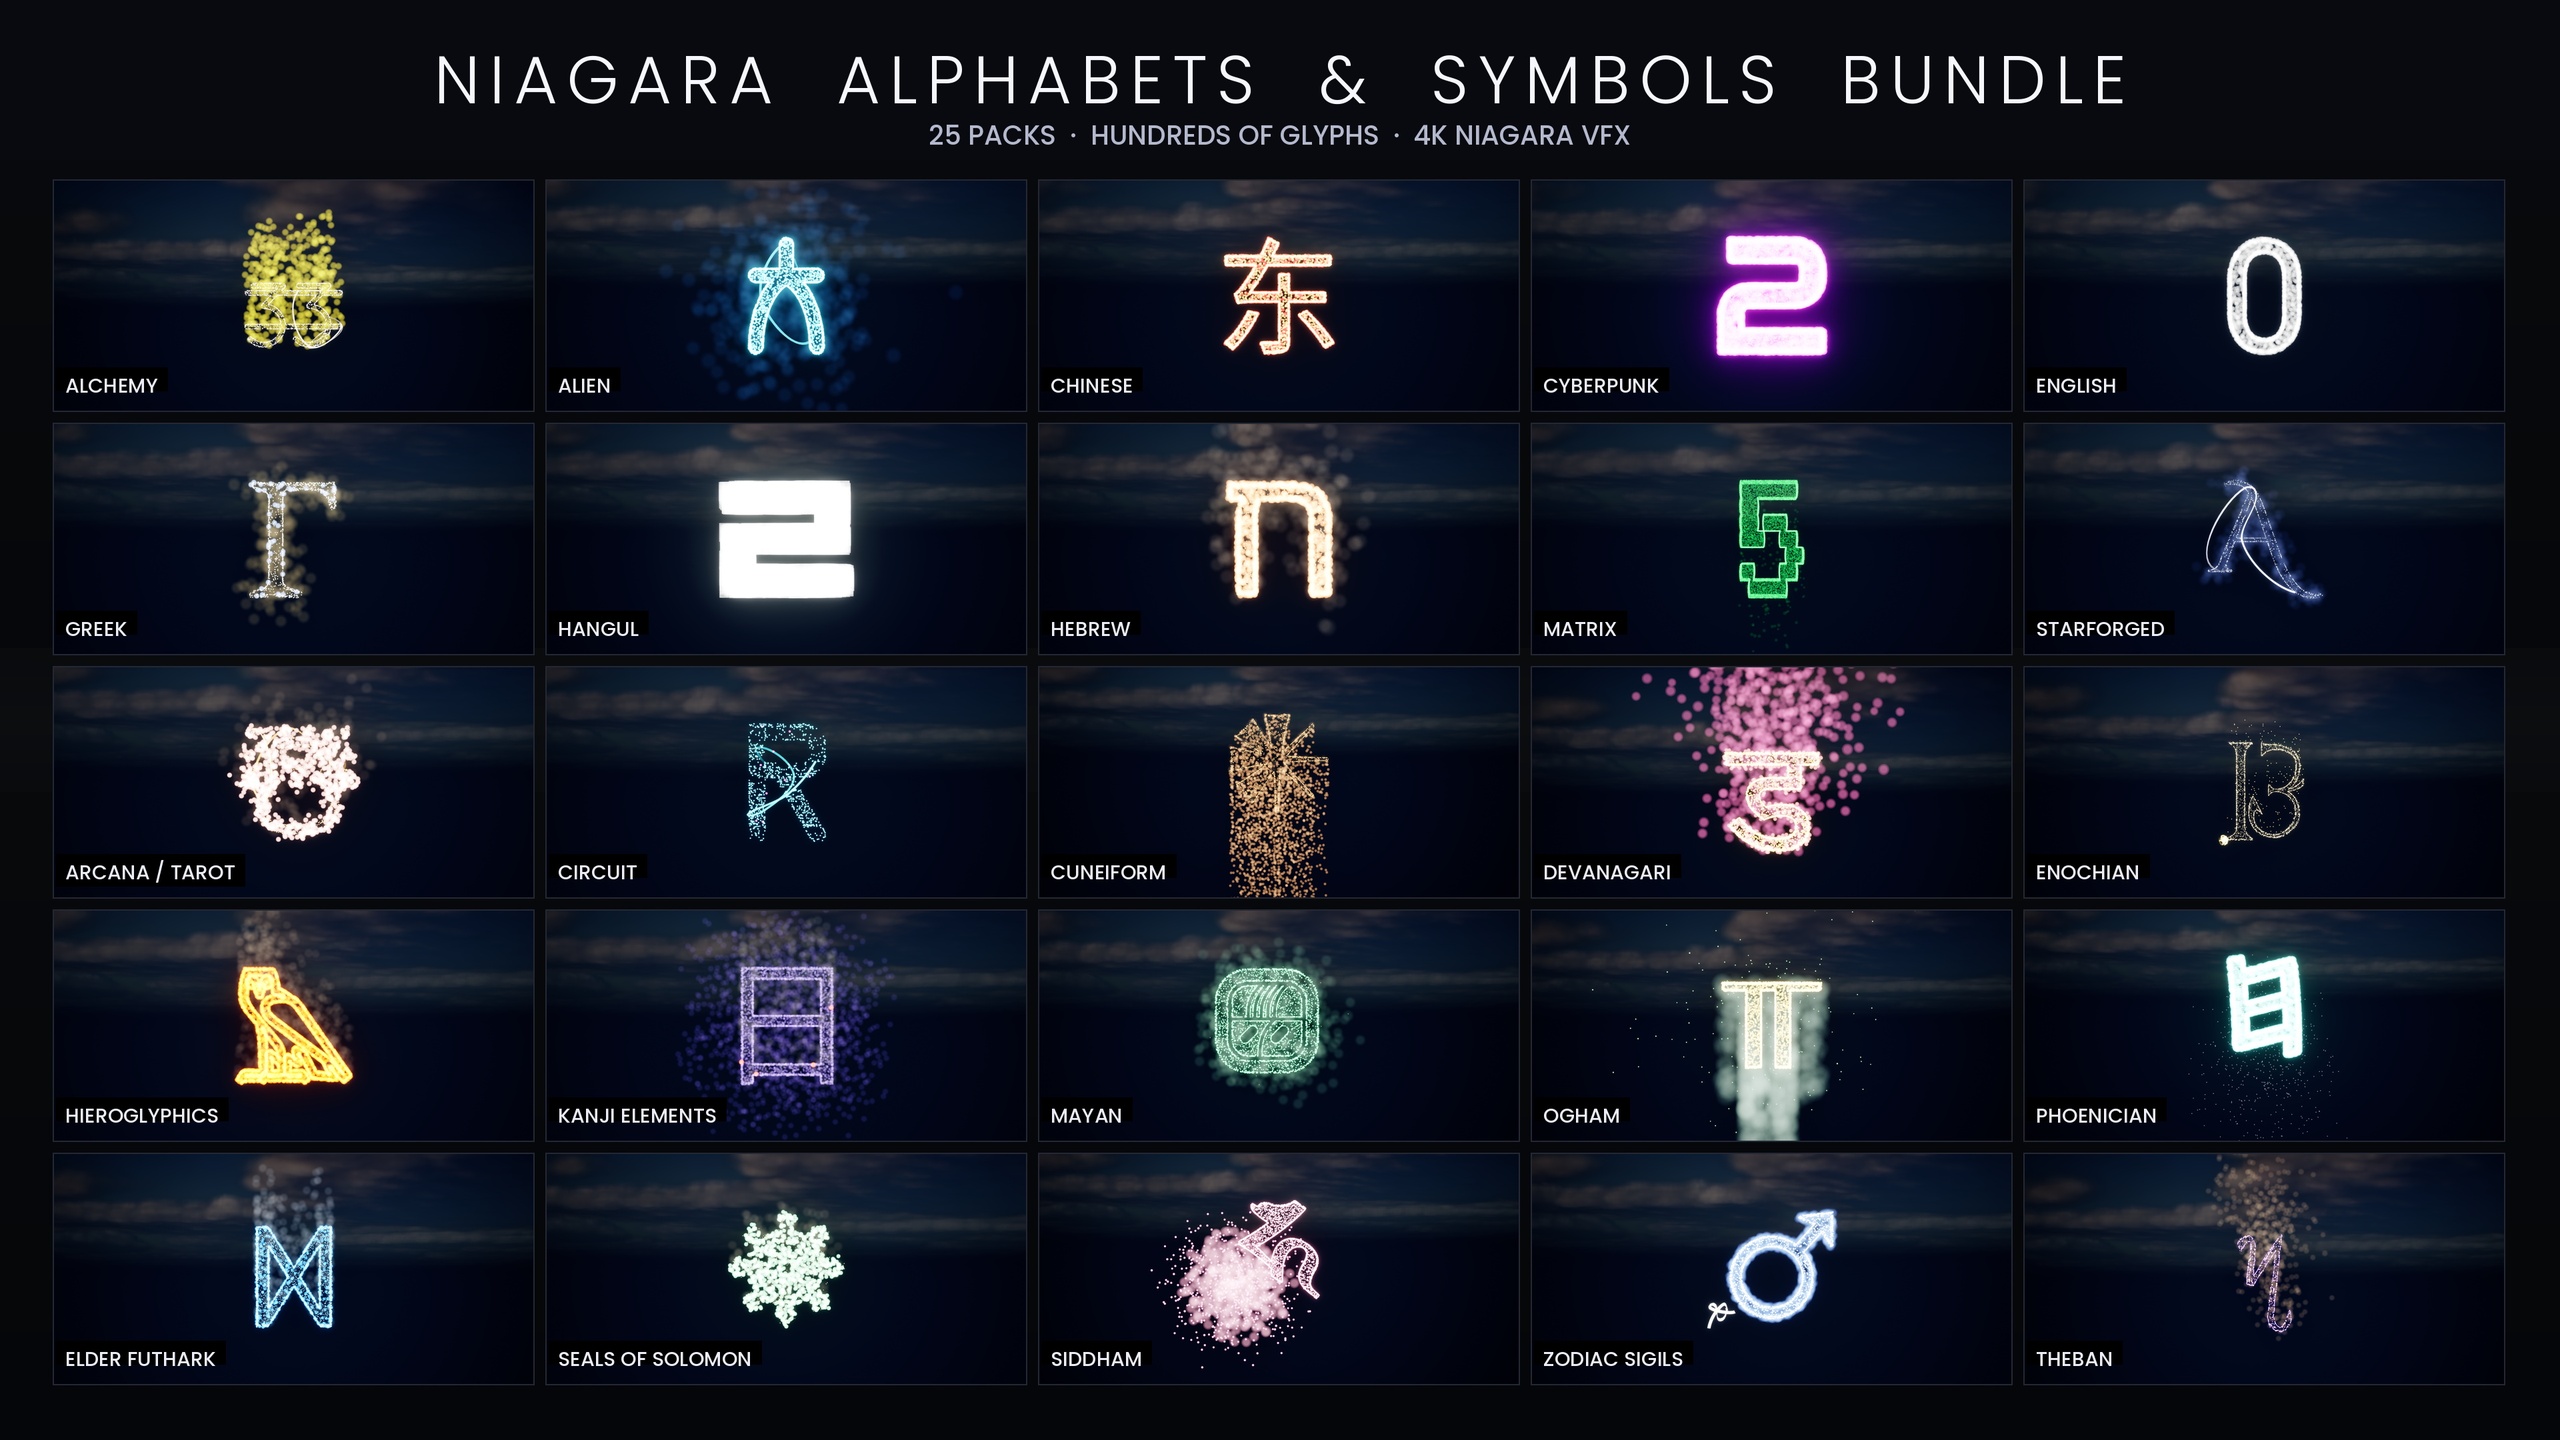
Niagara Alphabet & Symbols Bundle
The complete glyph VFX bundle — 687 Niagara systems built from 26 alphabets and symbol sets (Alchemy, Cyberpunk, Matrix, Hieroglyphics, Runes, Zodiac, Tarot and more), with per-theme Parameter Collections and two demo maps. All CPU-simulated for broad device support.