article · 2026-02-03
The Fastest Way to Build Open-World Terrain in Unreal Engine: Blocking Out with Heightmap Stamps
Drop mountain ranges, canyons, rivers and craters as editable stamps to go from a blank landscape to a readable world map in minutes.
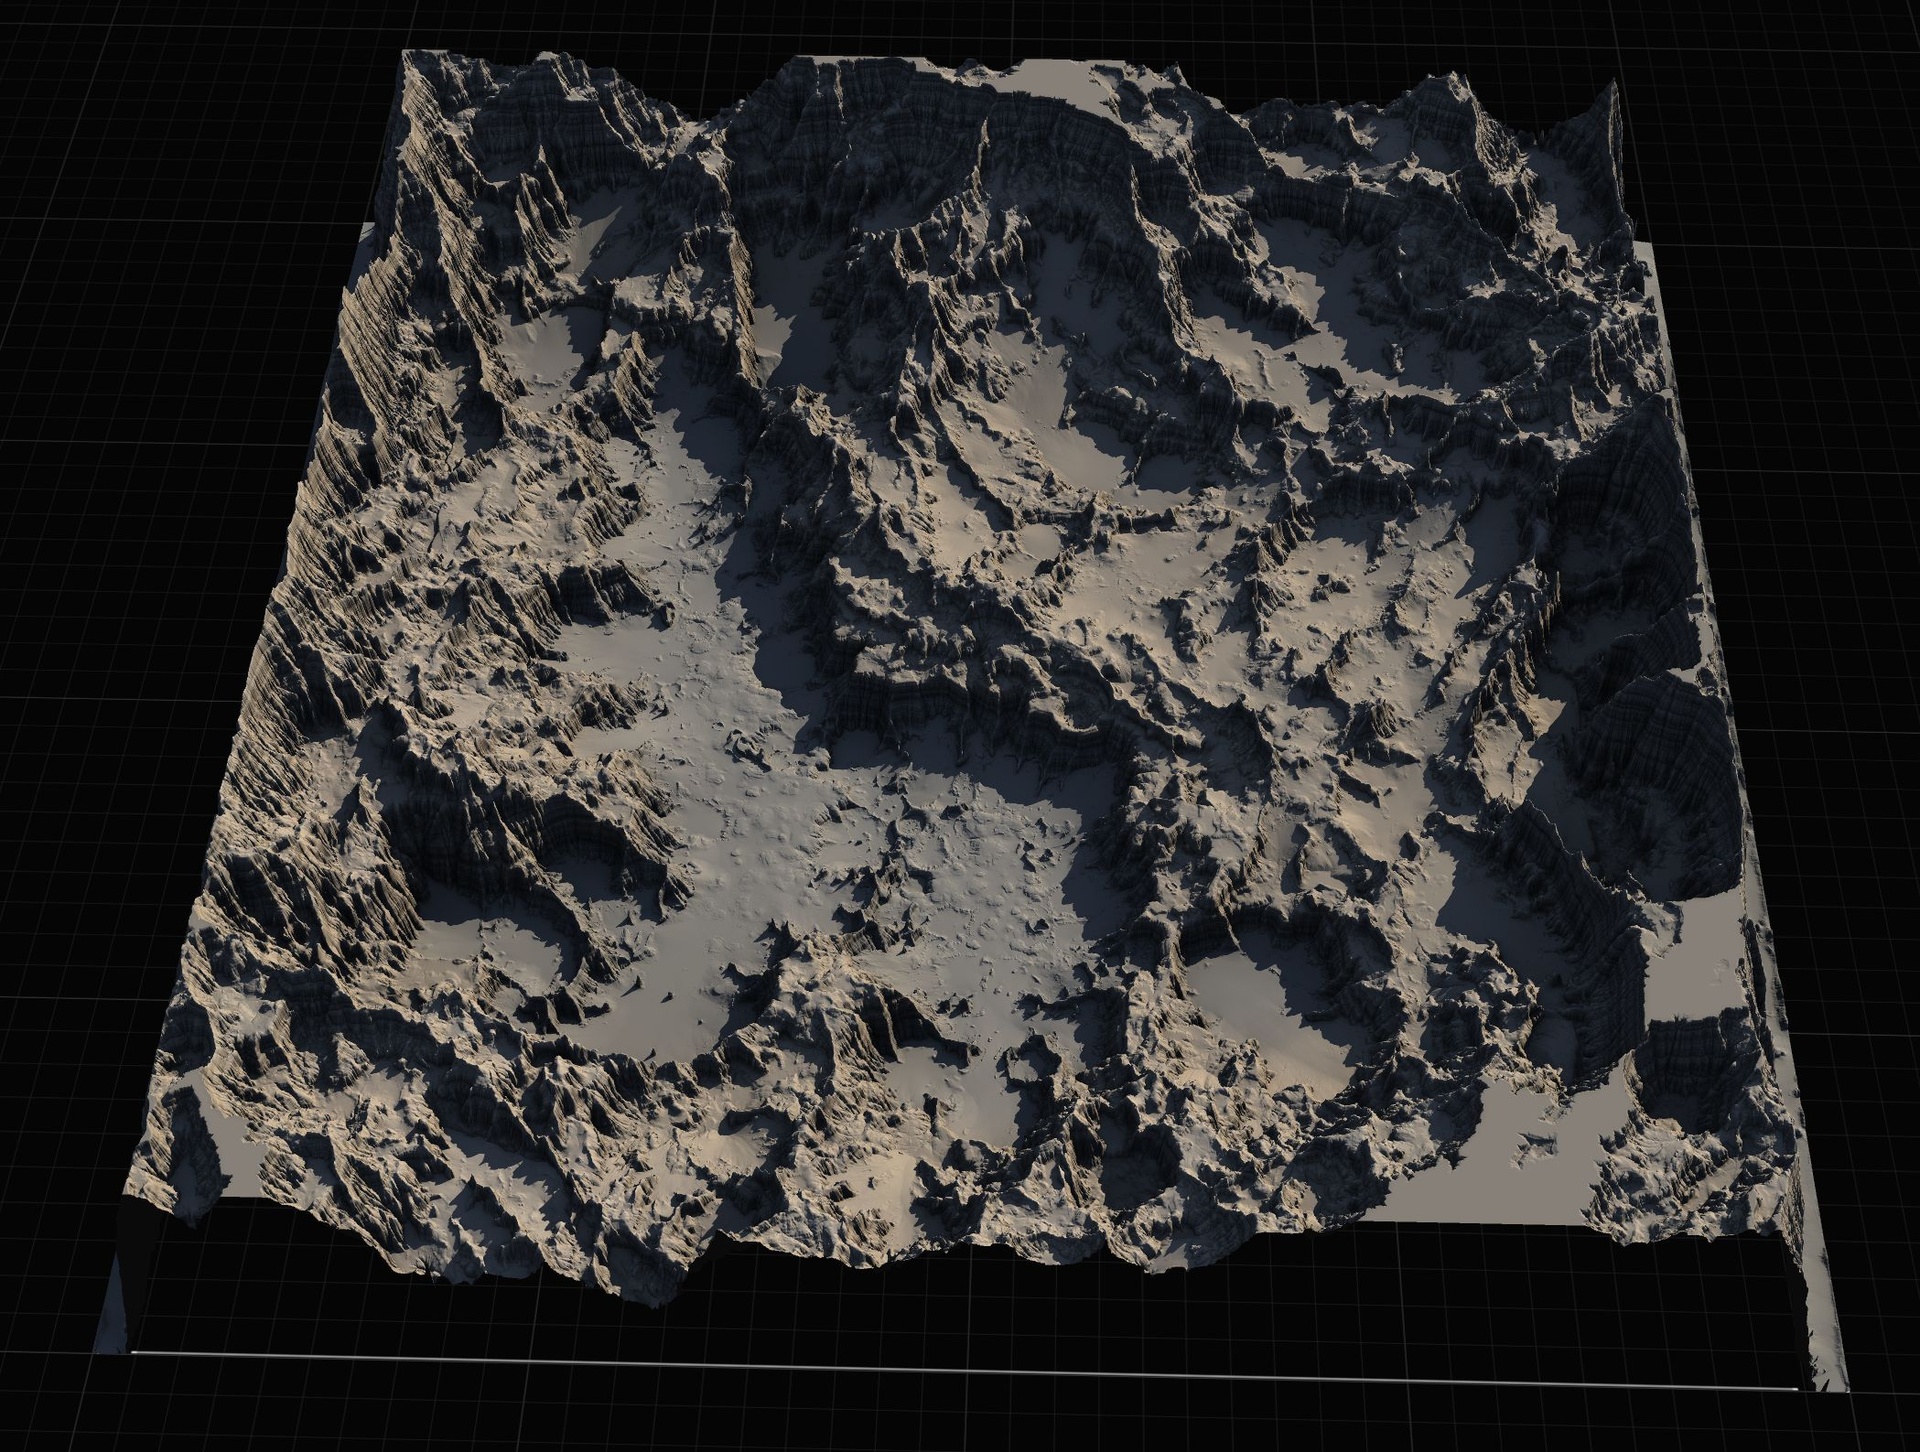
From a blank landscape to a readable world map
Open-world projects usually die at the blockout stage. You create a fresh landscape, stare at a flat grey plane, and realise that the fastest way to build open world terrain in Unreal Engine blockout is not, in fact, to hand-sculpt every mountain with a brush. Manual sculpting is slow, it is hard to undo cleanly, and the moment a designer asks you to move the mountain range two kilometres east, you are back to repainting half the map.
Heightmap stamps solve this by treating macro landforms as discrete, reusable objects you place into the level rather than strokes you paint into the heightmap. Instead of sculpting a mountain, you drop a mountain. Instead of carving a canyon, you place a canyon and slide it where you want it. The terrain stops being a single baked surface and becomes a layout you can reason about, like furniture in a room.
Landstamp Pro is a C++ editor plugin for Unreal Engine built around exactly this idea. It turns heightmap images into stamps you place as actors in the level. Each stamp drives a Landscape Texture Patch from Unreal's built-in Landscape Patch plugin to add, subtract or replace terrain height beneath it, and crucially every edit stays editable after placement. The plugin ships with a large stamp library, a visual Stamp Browser, and a tool that extracts a heightmap from any static mesh so you can turn meshes into custom stamps. This article walks through the blockout workflow it enables.
Laying down macro landforms as stamps
Start by opening the Stamp Browser from the toolbar. It is a visual thumbnail browser organised by category, with search and filtering and a recently-used tracker, so you can find a landform by eye rather than by digging through asset folders. The stamps are sorted into categories that map directly onto how you think about a world: Mountain, Canyon, Hill, Crater, River, Volcano, Directional, Creatures and Custom.
Pick the dominant feature of your region first. For most worlds that means a mountain range or a hill mass that defines the horizon. Drag the stamp from the browser onto your landscape. This spawns an ALandstampActor that automatically resolves the landscape beneath it: the stamp binds to whichever landscape's XY footprint contains it, or the nearest one, so you do not have to wire anything up by hand.
Now scale it to the world. Landstamp Pro exposes a set of size presets through EStampSize, from Small at 1000m through Medium at 2500m, Large at 5000m and Extra Large at 10000m, up to Massive at 20000m. For a continent-scale blockout you reach for the larger presets immediately; a 20000m Massive mountain mass establishes the spine of a region in a single placement.
1. Open the Stamp Browser and pick your dominant landform, for example a Mountain stamp.
2. Drag it onto the landscape; an 'ALandstampActor' spawns and auto-targets the landscape below it.
3. In the details panel set 'StampSize' in world units (or pick a size preset up to Massive at 20000m) and 'StampRotation' to orient the range.
4. Use the 'PreviewStamp' function (it is CallInEditor) to see the result without committing.
5. When you are happy, run 'ApplyToLandscape' to commit the patch, or 'ClearPreview' to discard it.
Repeat for the next few macro features. Block the whole region in broad strokes before you touch any detail. Within a handful of placements you have a silhouette you can read: a ridge line here, a basin there, high ground the player will climb toward. That readable world map is the entire point of a blockout, and stamps get you there in minutes rather than days.
Shaping each stamp: intensity, blend and falloff
A stamp is not a fixed shape you are stuck with. Each one exposes height and blending controls so the same heightmap can read as a gentle rise or a dramatic peak. HeightIntensity runs from -2 to 2, and because it accepts negative values you can invert a stamp outright: a mountain heightmap with negative intensity carves a matching depression. There is a MaxHeightDisplacement to cap how tall a stamp can push the terrain, plus per-stamp edge falloff.
Blend modes control how a stamp combines with the terrain already there. Landstamp Pro offers Additive, Subtractive, Replace, Maximum and Minimum through EStampBlendMode. Additive piles height on top of what exists; Subtractive digs in; Replace overrides; Maximum and Minimum take the higher or lower of the two surfaces, which is invaluable when you want a stamp to interact with neighbouring terrain rather than bulldoze it.
Falloff decides how the stamp's edge meets the surrounding ground. You choose a falloff shape through EStampFalloffMode, with Circle, Rounded Rectangle and Square options, and you control the transition either with blend-distance presets that scale with the stamp size, from Tiny at five percent through Massive at seventy-five percent, or with a manual blend distance. A wide falloff melts a hill smoothly into a plain; a tight falloff keeps a crater rim crisp.
Because every one of these properties lives on the stamp actor, you tune the look of your terrain by selecting an actor and editing numbers, not by repainting. That is what makes the blockout phase fast: shaping is a conversation with the details panel, not a sculpting marathon.
Iterating the layout because edits stay editable
The single biggest advantage of this workflow is that the layout never bakes. Stamps are Landscape Patch components, and the non-destructive nature of the system means you can move, re-scale, re-rotate or re-blend any stamp at any time without permanent landscape damage. Reposition the mountain range two kilometres east and the terrain follows it. Decide the canyon should be deeper and you nudge HeightIntensity. Nothing is committed in a way you cannot reverse.
This changes how you make layout decisions. Instead of treating the first sculpt as expensive and final, you treat the whole world as a draft you can rearrange. Designers can ask for a different valley placement on Friday afternoon and you can deliver it before you leave, because re-laying out the terrain freely is the default mode, not a costly exception.
When two stamps overlap, the ten-level priority system through EStampPriority decides which one renders on top. A higher-priority stamp wins where it overlaps a lower one, so you can layer features deliberately: lay a broad mountain mass at one priority and a sharper peak at a higher priority sitting on top of it, and the peak reads cleanly over the mass. For overlapping landscapes specifically, you can switch off auto-targeting and set TargetLandscape explicitly so a stamp affects exactly the surface you intend.
Treat the blockout as a living document. Place everything roughly, step back, read the world, then drag features around until the macro shape sings. None of that iteration costs you a re-sculpt, which is precisely why it is the fastest route to a finished layout.
Adding rivers, passes and craters for gameplay shape
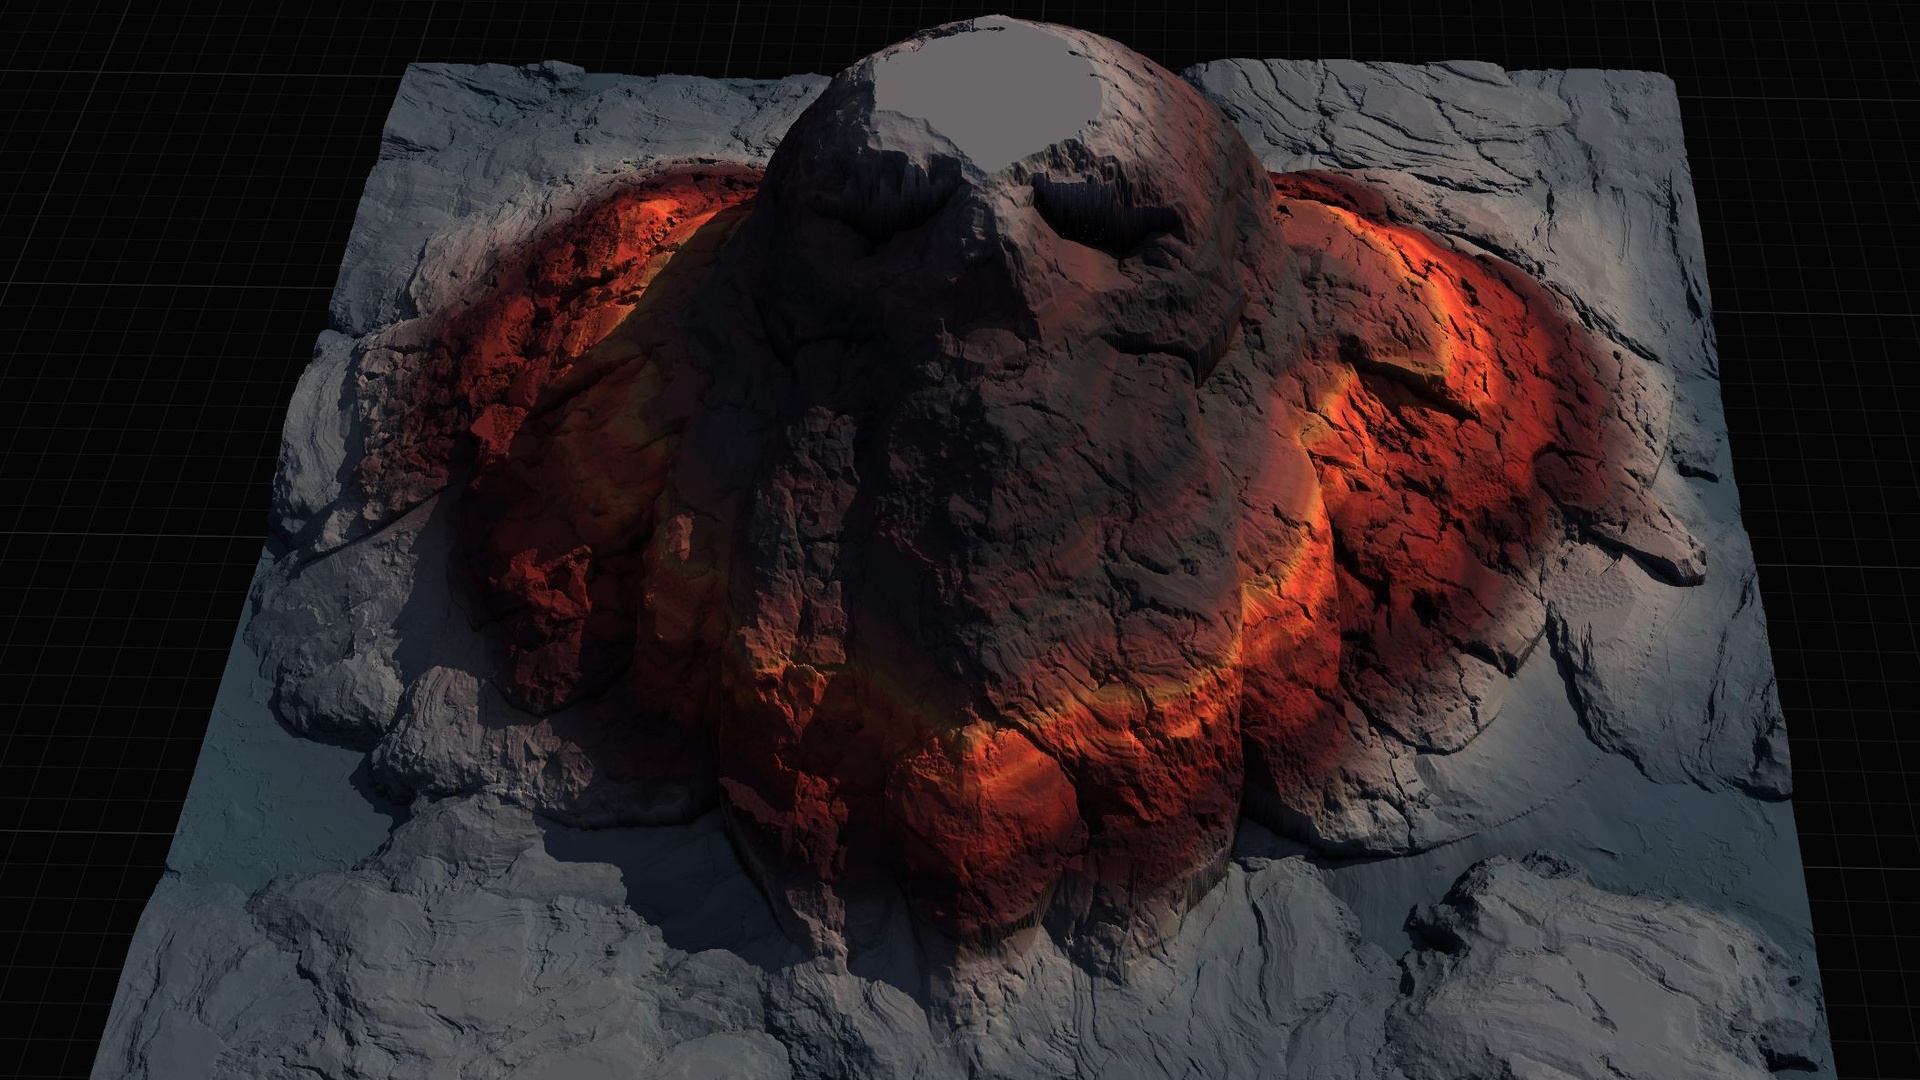
Once the broad landforms read, layer in the features that give a world gameplay meaning. The stamp library covers these directly through its categories. River stamps cut watercourses and valleys that naturally guide a player's eye and feet downhill. Directional stamps lay in passes, paths and crossings, the kind of routes that thread between two mountains and tell the player where they are meant to go. Crater stamps carve bowls and depressions for set-pieces, and Volcano stamps establish dramatic landmark peaks.
These details are where blend modes earn their keep. Drop a Volcano stamp into the middle of your mountain range and the blend mode and priority control decide how it punches into the existing mass: a volcano carved into a ridge with the right priority and a Subtractive or Maximum interaction composes a convincing complex landform out of two simple stamps. Use a River stamp with Subtractive blending to guarantee it always cuts below the surrounding ground rather than floating above it.
Think about player movement as you place these. A pass between two peaks is a chokepoint; a river is a soft barrier and a navigation cue; a crater is a destination. Because each is a separate, editable stamp, you can tune the gameplay read independently: widen the pass, deepen the river, soften the crater rim, all without disturbing the surrounding terrain.
If a feature you need is not in the library, you can build it. Landstamp Pro includes a mesh-to-heightmap extractor: FMeshHeightmapExtractor converts any UStaticMesh into a grayscale heightmap stamp, with automatic bounds detection, a live 3D preview with axis visualisation, and selectable output resolution at 512, 1K, 2K or 4K. Run it on a sculpted rock formation, a bespoke feature or even a logo, save the result as a new stamp asset, and it appears in the browser ready to place like any other.
When to combine stamps with ready-made heightmap packs
Stamps are unbeatable for composing a custom layout, but sometimes you want a whole landscape that already exists rather than one you assemble. That is where a heightmap pack complements the stamp workflow. The honest division of labour is this: import a full heightmap when you want a complete terrain as a starting point, and reach for stamps when you want to author or modify the macro shape yourself.
The Massive Open World Landscape Pack ships 14 distinct open-world landscapes, each provided as 16-bit grayscale heightmaps at four resolutions (1K, 2K, 4K and 8K) plus a demo level, a Gaea source file, and an AutoMaterial that auto-paints terrain by height and slope. You import one of these as a new Unreal landscape to get an explorable continent in a single step, then use Landstamp Pro stamps on top to add the rivers, passes and craters your design needs. A pre-made base plus editable stamps is often the quickest route of all.
If your world leans fantasy, the Mythic Relic Landscape Pack offers 14 lore-driven landscapes whose terrain forms iconic shapes such as a skull island or a hand-of-god isle, again at 1K through 8K with the same height-and-slope AutoMaterial and a set of bonus relic FBX meshes for dressing the scene. It is the budget, beginner-friendly entry in the line. Drop in one of its recognisable islands as a set-piece and stamp the surrounding terrain to taste.
Finally, if you are a Blueprint-only team and do not want a C++ plugin in your project, the Landscape Stamp Tool is the lighter sibling of Landstamp Pro. It is entirely Blueprint, built on the same Landscape Patch approach, and provides seven geological tool types (Canyon, Crater, Directional, Hill, Mountain, River and Volcano) that you drag into a World Partition level to morph the terrain in place. It carries a smaller library and no mesh extractor, so choose it when no-code is the priority and reach for Landstamp Pro when you want the full C++ feature set, the larger stamp library and mesh-to-stamp conversion.
Getting started
Install Landstamp Pro and it enables Unreal's Landscape Patch plugin for you automatically; it also depends on the bundled ProceduralMeshComponent and EditorScriptingUtilities plugins. The plugin is editor-focused and Windows 64-bit, and it states zero runtime cost in packaged builds because the stamps are an editor authoring layer, not a gameplay system.
From there the loop is simple: open the Stamp Browser, drop your macro landforms, preview and apply, then iterate the layout freely until the world reads the way you want. Layer in rivers, passes and craters for gameplay, build any missing feature with the mesh-to-heightmap extractor, and pull in a ready-made heightmap pack whenever a finished base saves you time. That is the fastest path from a blank Unreal landscape to a blocked-out open world you can actually start building on.
Choosing your terrain blockout approach
| Product | Type | What it gives you | Best when |
|---|---|---|---|
| Landstamp Pro | C++ editor plugin (Win64) | 370+ editable stamps, Stamp Browser, blend/falloff/priority controls, mesh-to-heightmap extractor | You want to author and iterate the macro layout yourself with the full feature set |
| Landscape Stamp Tool | Blueprint-only tool (Windows) | Seven geological tool blueprints (Canyon, Crater, Directional, Hill, Mountain, River, Volcano), ~110 heightmap textures | You are a Blueprint-only team and want no C++ in the project |
| Massive Open World Landscape Pack | Heightmap content pack (Windows) | 14 open-world landscapes at 1K-8K, AutoMaterial, demo levels, Gaea sources | You want a complete explorable terrain as a starting base |
| Mythic Relic Landscape Pack | Heightmap content pack (Windows) | 14 fantasy landscapes (skull island, hand-of-god isle, etc.) at 1K-8K, AutoMaterial, bonus relic FBX meshes | You want a lore-driven, recognisable set-piece terrain on a budget |
All four products use Unreal's Landscape Patch / heightmap approach. Counts and specs are from each product's verified facts; engine and platform support are as stated by the source, not assumed.
FAQ
What is the fastest way to build open world terrain in Unreal Engine for a blockout?
Place macro landforms as heightmap stamps rather than hand-sculpting. With Landstamp Pro you open the Stamp Browser, drag mountain, canyon, river and crater stamps onto your landscape, scale them up to the Massive 20000m preset, then preview and apply. Because every stamp stays editable, you can rearrange the whole layout afterward without re-sculpting, which is what makes it fast.
Are the terrain edits non-destructive?
Yes. Each stamp drives a Landscape Texture Patch from Unreal's built-in Landscape Patch plugin, so the edits remain editable after placement. You can move, re-scale, re-rotate or re-blend any stamp at any time without permanently damaging the landscape, and overlapping stamps are resolved by a 10-level priority system.
Can I make my own custom stamps?
Yes. Landstamp Pro includes a mesh-to-heightmap extractor that converts any static mesh into a grayscale heightmap stamp, with automatic bounds detection, a live 3D preview and selectable output resolution (512, 1K, 2K or 4K). Save the result as a new stamp asset and it appears in the Stamp Browser alongside the built-in library.
How is Landstamp Pro different from the Landscape Stamp Tool?
Landstamp Pro is a C++ editor plugin with a 370+ stamp library, a Stamp Browser UI and a mesh-to-heightmap extractor. The Landscape Stamp Tool is the lighter, Blueprint-only sibling built on the same Landscape Patch approach, with seven geological tool types and no C++ requirement. Choose the Blueprint tool when no-code matters most; choose Landstamp Pro for the full feature set and larger library.
Does Landstamp Pro add runtime cost to a packaged game?
No. It is an editor-focused plugin used during authoring, and it states zero runtime cost in packaged builds. The stamps are an editor layer that shapes your landscape; they are not a gameplay system that runs at game time. It is Windows 64-bit and editor-only.
Landstamp Pro
Sculpt production terrains in minutes, not hours. Landstamp Pro is a professional heightmap stamping system for Unreal Engine — combine, layer and blend stamps with precise control and real-time preview, fully non-destructive.